8.3 Recommended settings for Zebra printers
Note: If you intend to select the Skip Printing option in MyID, so that the card is electronically personalized but not printed, make sure that you disable the lamination feature on the printer. A successful card personalization results in the card passing through the lamination unit; this would make it impossible for you to print the card at a later date.
You must configure the following for your Zebra ZXP-8 printer:
-
The printer properties.
-
The ZXP Toolbox.
To configure the recommended settings for Zebra ZXP-8 printers:
- In the Windows Devices and Printers control panel, right-click the card printer.
- From the pop-up menu, select Printer properties.
- Click the Advanced tab.
- Click Printing Defaults.
-
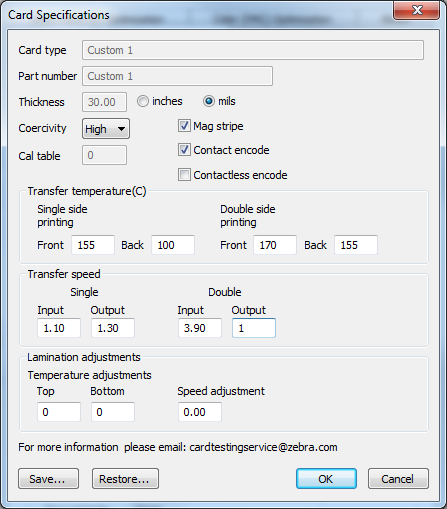
In Card Setup, set the Card type in use to Custom 1 with the following settings:
-
Ensure both Mag stripe and Contact encode are selected.
-
Set Coercivity to High.
-
Under Double side printing, set the Back number to 150 or 155, whichever produces a better print result.
-
In the Transfer Speed section, under Double, set the Input range to 3.90 or 4.0, whichever produce a better print result.
-
- Click OK.
- In Card Setup, select Front K Extraction.
-
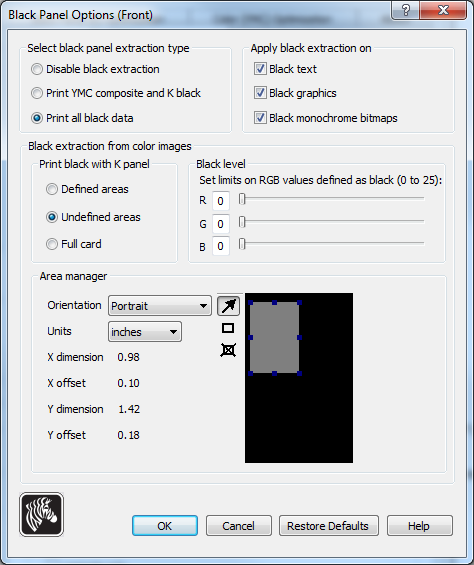
Set the Black Panel Options (Front) options to the following settings:
-
Ensure the Undefined areas option is selected.
-
Set the Orientation to Portrait.
-
Set the Units to inches.
-
Resize the square in the box to the following dimensions:
- X dimension: 0.98.
- X offset: 0.10.
- Y dimension: 1.42.
- Y offset: 0.18.
This is the area reserved for the picture.
-
- Click OK.
- In the Properties dialog, click the Black Panel (K) Optimization tab.
-
Set the following options:
-
Under Front side black panel Optimize for, select Text.
-
Under Back side black panel Optimize for, select Mixed.
-
- Click the Card Setup tab.
-
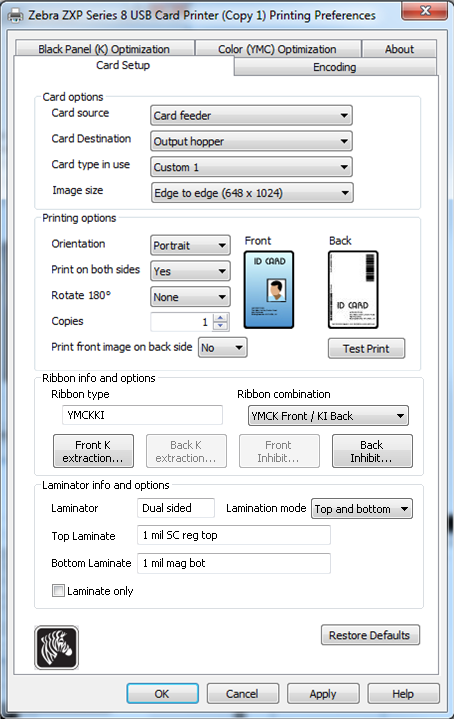
Set up the options to match this screenshot:

Note: You may need to select the Rotate 180° option to rotate the front image to ensure that the image is in the correct place relative to the chip on the card; check the results before printing a production card.
- Click Apply.


To configure the ZXP Toolbox settings:
- Select Zebra ZXP Series 8 USB Card Printer Properties > Device Information > ZXP Toolbox.
- Expand Configuration and select Printer Settings.
- Under Print Performance Setting, set Performance Option to No error recovery (None).
- Expand Advanced Security and select Configure Security
- Under Last Print job options, select Erase job data following successful card printing.
- Click Save.
- Expand Configuration, select Printer Settings, and click Advanced Settings.
-
Click OK and enter the following password when prompted:
ZebraZXPS8
Note: The password is case sensitive.
- Click OK.
- Click the Mechanical and Power Adjustment tab.
- Set the Inhibit option to 90.
- Click Apply.
- Click the Laminator Adjustments tab.
- Set the Roller Temperature Offset (*C) to -5.
- Click Save All Parameters to EEPROM.
- Click Exit.