2.2 Installing the MyID Client for Windows
The MyID Client for Windows and the MyID Client Tray Service are provided in MSIX installation programs.
Note: You are recommended to keep the versions of the MyID Client for Windows and the MyID Client Tray Service the same to ensure compatibility.
MSIX installation programs have the following features:
-
Applications installed from an MSIX are installed into a lightweight AppContainer, which isolates it from the rest of the system; the application's files are locked-down and inaccessible, and parts of the system, such as the registry, are virtualized inside the container. This provides both security and reliability.
-
MSIX applications are installed for each user. If a second user installs the application, Windows reuses the original files for the second user rather than duplicating them.
-
MSIX applications are optimized for installation over a network; when updating an MSIX package from a network location, only the changes from the updated MSIX are copied to the local machine.
For more information about MSIX installation, see:
2.2.1 Installing the client software interactively
To install the MyID Client for Windows or the MyID Client Tray Service:
-
Double-click the .msix file.
The installation programs are provided in the following folder in the installation image:
\MyID Clients\MyID Client for Windows\
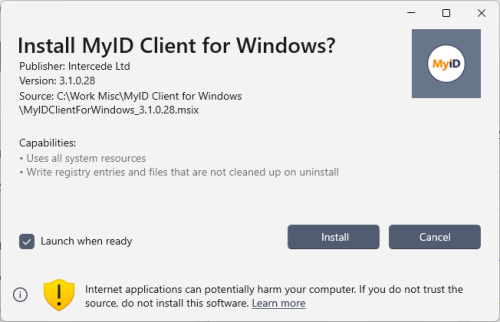
The installation program opens.
-
If you want to launch the software immediately once it has been installed, make sure that Launch when ready is selected.
-
Click Install.

Note: You cannot customize the installation or provide server details in the installation program. If your organization wants to configure the software for end users, you can distribute an administrator configuration file; see section 7.2, Setting up an administrator configuration override file.
2.2.1.1 Listed capabilities
The capabilities listed for the MyID Client for Windows are:
-
Uses all system resources
The MyID Client for Windows is a Medium IL (integrity level) or full trust app. To allow this from an MSIX installation requires the runFullTrust MSIX capability.
-
Write registry entries and files that are not cleaned up on uninstall
The MyID Client for Windows disables virtualization for the %LocalAppData%\Intercede\MyID Client\ folder, which allows it to write user configuration and log files outside of the MSIX container. This also allows the MyID Client Tray Service to share configuration settings with the MyID Client for Windows. Note that files written to this folder are not removed on uninstall.
2.2.2 Installing the client software silently
You can use Windows PowerShell to carry out a silent install. At the Windows PowerShell prompt, run the following command:
Add-AppxPackage "<path>\MyIDClientForWindows_<version>.msix"
where:
-
<path> – the path where the .msix file is located.
-
<version> – the version of the client software.
This runs the installation silently, and installs the software for the current user.
For example:
Add-AppxPackage "C:\Software\MyIDClientForWindows_3.1.0.99.msix"
2.2.3 Installing the client software for all users
You can provision MSIX packages to a Windows image; either to an image that you intend to deploy to PCs, or to a live image that is currently running on a PC. The software is then available to any new users who log on to the PC.
To provision an MSIX, run the following Windows PowerShell command:
Add-AppxProvisionedPackage -Online -PackagePath "<path>\MyIDClientForWindows_<version>.msix"
where:
-
<path> – the path where the .msix file is located.
-
<version> – the version of the client software.
For example:
Add-AppxProvisionedPackage -Online -PackagePath "C:\Software\MyIDClientForWindows_3.1.0.99.msix"
2.2.4 Managing deployments using App Installer files
Microsoft provides a feature that allows you to manage deployments with an App Installer file. This allows you to control the versions being deployed from a central location (for example. an App Installer file on a network drive) even when copied locally, as the local App Installer file is aware of and will refer to the original file on the network. You can also use your AppInstaller file to configure automatic updates.
For more information, see:
learn.microsoft.com/en-us/windows/msix/app-installer/app-installer-file-overview
2.2.5 Troubleshooting installation
Windows provides logs that you can consult if there is an issue with MSIX deployment. You can find these logs in the Windows Event Viewer in the following locations:
-
Applications and Services Logs > Microsoft > Windows
-
AppXDeployment
-
AppXDeployment-Server
-
AppXDeployment-Server-UndockedDeh
-
AppXPackagingOM
-