2.9 Configuring https
Using https for communication with your web server is far more secure than using http, and you are strongly recommended to configure this for your system.
Important: The web services used by the MyID Operator Client (rest.core and web.oauth2) require SSL/TLS; if you do not connect through https, you cannot use the MyID Operator Client.
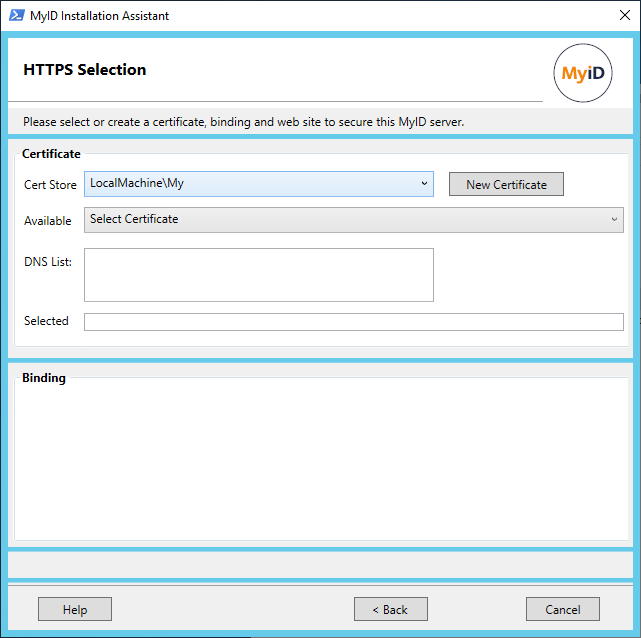
The MyID Operator Client helps you set up and test your https configuration. For pre-production systems, the MyID Installation Assistant allows you to create a self-signed certificate, or a domain-signed certificate using a Microsoft CA, to secure your https connection; however, for production systems, you are strongly recommended to obtain a certificate provided by a commercial CA provider, which has the advantage that the root certificate already exists in your certificate store and is trusted in most browsers by default.
Setting up SSL requires the following:
-
Protocol – you must use the https protocol to communicate with the website.
-
Certificate – the connection is secured by a certificate. This certificate may be self-signed, domain-signed, or obtained from a commercial CA provider; the MyID Installation Assistant allows you to use any of these.
-
Binding – the certificate is bound to the website that will contain the MyID web pages and services using a specific port. The MyID Installation Assistant allows you to select an existing binding, or to set up a new binding.
For more information about https and SSL/TLS, see the Configuring SSL/TLS (HTTPS) section in the Securing Websites and Web Services document.
2.9.1 Selecting an existing certificate and binding
If you have already set up IIS with your certificate and bound it to the web site, you can select it on this screen.
-
From the Cert Store drop-down list, select the certificate store that contains the certificate you are using for https.
-
From the Available drop-down list, select the certificate you are using for https.
The details of the certificate are shown in the Certificate section, and the details of the binding are show in the Binding section.
-
Click Next to proceed to the next stage.
2.9.2 Selecting an existing certificate and creating a new binding
If you have a certificate available to IIS, but have not yet bound it to the web site you are going to use for MyID, you can use the MyID Installation Assistant to create a new binding.
-
From the Cert Store drop-down list, select the certificate store that contains the certificate you want to use for https.
-
From the Available drop-down list, select the certificate you want to use for https.
-
Click New Binding.
The Create New Binding screen appears:

-
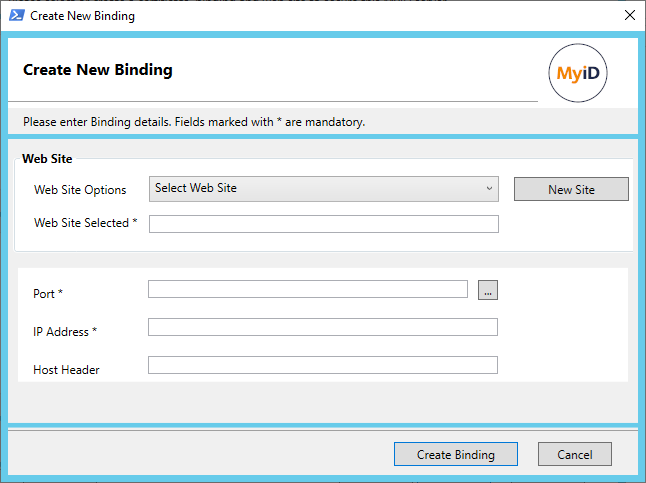
Select the web site you are going to use for MyID from the Web Site Options drop-down list.
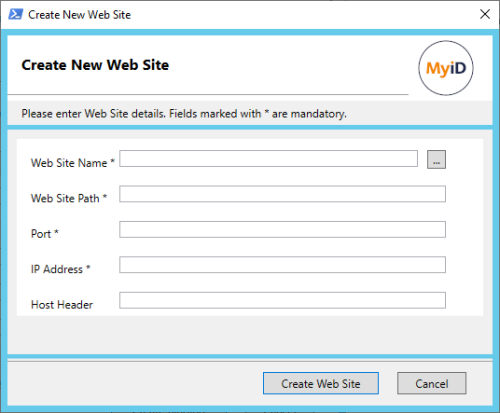
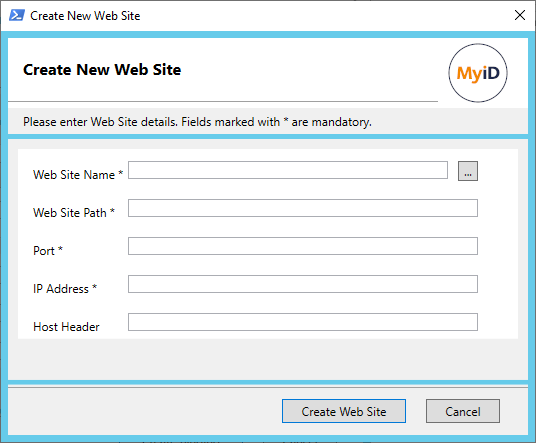
If necessary, you can create a new web site:
-
Click New Site:
-
Provide the following details:
-
Web Site Name – the site name for the new web site.
-
Web Site Path – the physical path for the new web site.
-
Port – the port to be used for the binding.
-
IP Address – the IP address for the binding. Type * to specify all unassigned IP addresses.
-
Host Header – the host name for the web site. This is optional, and allows different bindings to handle different client requests to the same web site.
You can click the ... button to populate the fields with defaults.
-
-
Click Create Web Site to add the new web site to IIS.
-
-
If you are using an existing web site, provide the following details:
-
Port – the port to be used for the binding.
-
IP Address – the IP address for the binding. Type * to specify all unassigned IP addresses.
-
Host Header – the host name for the web site.
-
-
Click Create Binding.
-
If the web site Status is not Started, click Start Website.
-
Click Next to proceed to the next stage.
2.9.3 Creating a new certificate and binding
For pre-production systems only, the MyID Installation Assistant allows you to create a self-signed certificate or a domain-signed certificate to use for https access to the MyID web site.
A self-signed or domain-signed certificate has the following limitations compared to a commercial certificate:
|
Self-signed certificate |
Domain-signed certificate |
Commercial certificate |
|---|---|---|
|
Not created using a CA. |
Created from a Microsoft CA only. |
Created from any CA. |
|
Can be created on split tier or single tier using the MyID Installation Assistant. |
Can be created on a single tier system using the MyID Installation Assistant. |
Created outside the MyID Installation Assistant. |
|
Can be set up by a user with Domain or Local Admin permissions. |
Must be set up by a user with Domain Admin permissions. |
Can be set up by a user with Domain or Local Admin permissions. |
|
The root certificate must be copied into the certificate store manually. |
The root certificate must be copied into the certificate store manually. |
The root certificate already exists in the certificate store and is already trusted in most browsers by default. |
To create a new https certificate:
-
Click New Certificate.
The MyID Installation Assistant displays a warning about the limitations of a self-signed or domain-signed certificate. Click Yes to continue.
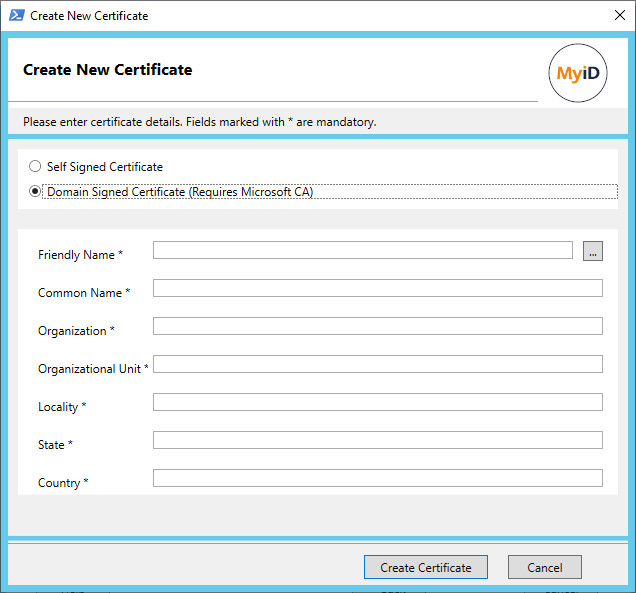
The Create New Certificate screen appears.
-
Select one of the following options:
-
Self Signed Certificate
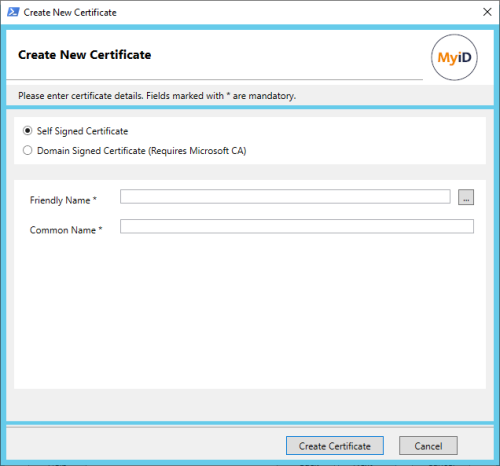
Provide the following details for the certificate:
-
Friendly Name
-
Common Name
You can click the ... button to populate the fields with defaults.
Note: Currently, the MyID Installation Assistant uses the Common Name for the Issuer, Subject, and Subject Alternative Name fields in the certificate. If you want to create a self-signed certificate with additional names in the Subject Alternative Name field, see section 2.9.5, Specifying subject alternative names in self-signed certificates.
-
-
Domain Signed Certificate
Important: You must have the correct permissions to create a domain-signed certificate. See section 2.9.4, Permissions for domain-signed certificates for details. If you do not have the correct permissions, this option is disabled.

Provide the details that will be used to populate the certificate.
You can click the ... button to populate these fields with defaults.
-
-
Click Create Certificate.

Once you have created the certificate, you can use it for the binding to the web site. Follow the instructions in section 2.9.2, Selecting an existing certificate and creating a new binding above.
2.9.4 Permissions for domain-signed certificates
You must have logged on as a domain administrator to create a domain-signed certificate. If necessary, you can close the MyID Installation Assistant, log on as a domain administrator, use the MyID Installation Assistant to create the domain-signed certificate, then log back on as the installation user to continue using the MyID Installation Assistant.
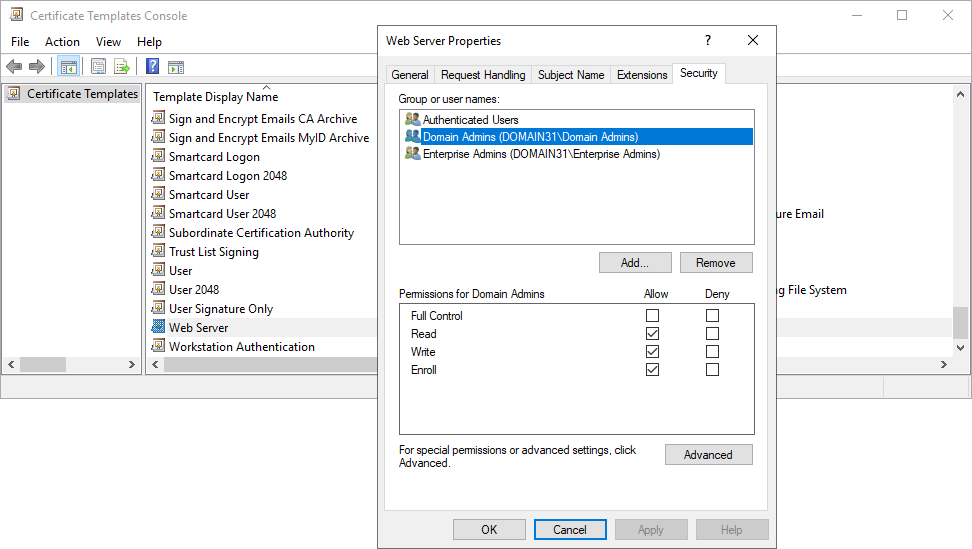
Additionally, the logged-on user must have Read, Write, and Enroll permissions for the Web Server certificate template on the Microsoft Certification Authority.
Note: You can create a domain-signed certificate using the MyID Installation Assistant on a single-tier system; you cannot create a domain-signed certificate using the MyID Installation Assistant on a split-tier web server. For split-tier systems, you must create your certificate first before running the MyID Installation Assistant.
To check permissions for the Web Server certificate template:
-
Open the Certification Authority application.
-
Right-click Certificate Templates, then from the pop-up menu select Manage.
-
In the Certificate Templates Console, double-click the Web Server template.
-
In the Web Server Properties dialog, click the Security tab.

-
Verify that the installation user has Read, Write, and Enroll permissions, or belongs to a group that has those permissions.
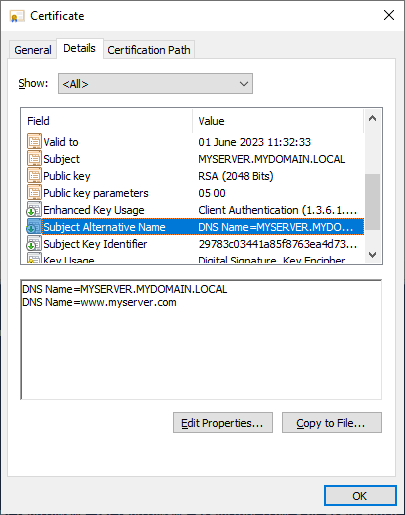
2.9.5 Specifying subject alternative names in self-signed certificates
Currently, the MyID Installation Assistant supports only a single name that is used for the Issuer, Subject, and Subject Alternative Name fields in the certificate. If you want to create a self-signed certificate with additional names in the Subject Alternative Name field, you can do so using a PowerShell script, specifying the primary and additional names using the DnsName parameter.
For example:
$CommonName = "MYSERVER.MYDOMAIN.LOCAL"
$AltName = "www.myserver.com"
$FriendlyName = "Self Signed: MYSERVER.MYDOMAIN.LOCAL"
$temp = New-TemporaryFile
$cert = New-SelfSignedCertificate -CertStoreLocation cert:\LocalMachine\My -DnsName $CommonName, $AltName -FriendlyName $FriendlyName -KeyAlgorithm RSA -KeyLength 2048
Write-Host "Created Self Signed Certificate"
Export-Certificate -Type CERT -FilePath $temp -Cert $cert | Out-Null
Write-Host "Exported Self Signed Certificate"
Import-Certificate -FilePath $temp -CertStoreLocation cert:\LocalMachine\Root | Out-Null
Write-Host "Imported Self Signed Certificate"
This example creates a self-signed certificate that uses MYSERVER.MYDOMAIN.LOCAL in the Issuer, Subject, and Subject Alternative Name fields in the certificate, but also adds www.myserver.com to the Subject Alternative Name field.
For example: