4.2 Archiving the audit trail
Every operation within MyID generates audit information. Over time, this information can build up and ultimately reduce performance due to the size of the data. As a solution to this, you can create an archive database.
-
Old audit data (which is likely to be rarely viewed) is transferred into this database using a SQL scheduled task.
Note: MyID does not automatically archive records; you must set up the scheduled SQL task. See section 4.2.2, Create a SQL timed task for details.
-
The quantity of the live (recent) audit data, which is the data that is viewed most often, is kept small. This improves search performance.
Warning: The instructions in this section allow you to archive the audit trail. You must check Microsoft documentation for full operating instructions for Microsoft SQL Server.
You can still view archived audit information within MyID. The default MyID installation stores both current and archived audit information (separately) within the main MyID database. You can also store current and archived audit information in separate databases, which could be on separate servers.
4.2.1 Create a separate database for archiving audit records
You can select the Archive Database Server option when installing MyID to create an archive database.
Note: This procedure is very similar to creating a separate audit database. The difference is that the audit database is used for current audit records and uses the MyIDaudit.udl file to point to the database, and the archive database is used for old audit records, and uses the MyIDarchive.udl file to point to the database.
-
Create an archive database to use for your audit archive.
The installation procedure is the same as creating a separate audit database; see section 4.1, Using a separate audit database.
-
On the MyID application server, update the audit archive.udl file to point to the correct database:
- Open a Windows command prompt as an Administrator.
- Navigate to the Windows System32 folder.
-
Type the name of the audit archive.udl file, then press Enter.
The audit archive.udl filename has the format:
<databasename>archive.udl
where <databasename> is the name of the main MyID database ; for example, MyIDarchive.udl
This opens the Data Link Properties dialog, which allows you to change the data link file.
- Set the properties to point to the server and database you created to store the archived audit information.
4.2.2 Create a SQL timed task
This procedure is performed on the SQL server that stores the live audit information.
-
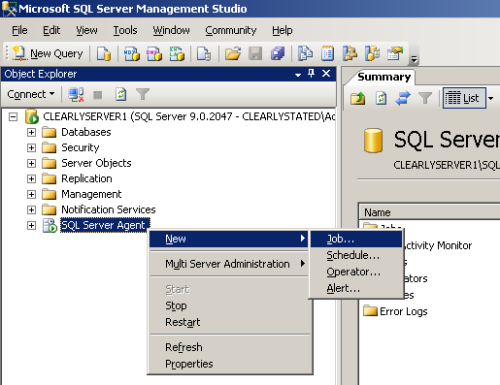
Select the SQL Server Agent in the Microsoft SQL Server Management Studio.
Note: You will not be able to access the folders described in the following steps unless the service is running. You may have to start it by right-clicking it and selecting Start from the menu.
-
Right-click the SQL Server Agent and select New, then Job from the menus displayed.
-
The New Job box is displayed, with the General page highlighted.
- Give the job an appropriate Name to help you identify it later.
- Set Owner to an account with administrative privileges.
Note: If the archived data is to be stored on a separate server, the account must have sufficient privileges for both the current server and the server that will be used to store the archive.
-
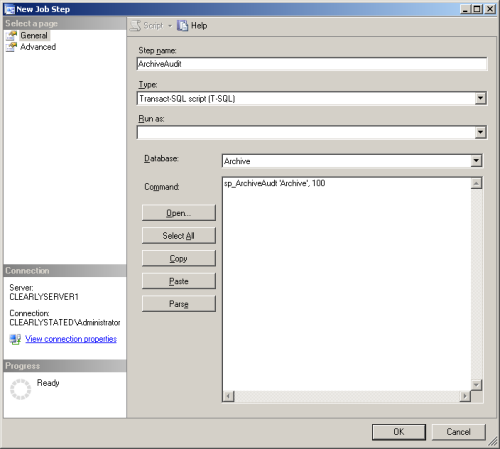
On the Steps page, click New to create a new step for the job.
The New Job Step box is displayed.
- Enter a Step name.
- Select the Database that contains the data to be archived; this is your main MyID database.
-
In the Command: area, type:
sp_ArchiveAudit '<archivedatabase>', <daysOld>
where:
-
<archivedatabase> is the name of the database that will store the archived data.
- If a single database is being used to store both live and archive information, then the value of <archivedatabase> will be the same as the name selected from the list in Database. The archived data will be moved into a separate table.
-
If the archive database name begins with numbers, you must enclose the database name in square brackets. For example:
sp_ArchiveAudit '[20100101_CMSArchive]', 90
-
If the archive database exists on a different server, you must configure this as a named "linked server" within SQL Enterprise manager.
The <archivedatabase> would then be specified as:
<LinkedServerName>.<ArchiveDatabaseName>
where:
- <LinkedServerName> is the name of the linked server.
- <ArchiveDatabaseName> is the name of the archive database on that server.
-
<daysOld> is the age of data, in days, that will be archived.
For example:
sp_ArchiveAudit 'ArchiveDB', 90
When this task runs, all audit data that is more than 90 days old is moved from the database chosen in Database to the ArchiveDB database.
-
-
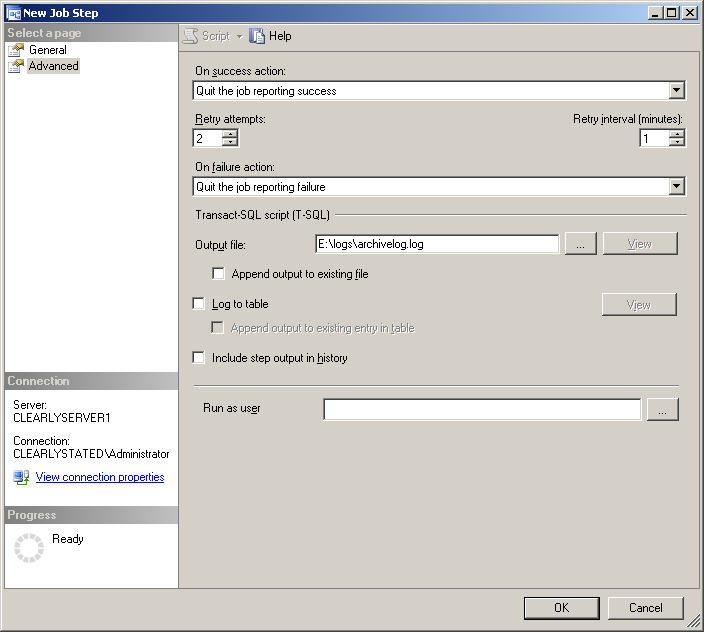
On the Advanced page, specify a log file.

The audit archiving procedure produces a log file that reports statistics concerning the archiving procedure, including the number of records archived and error information. Intercede recommends that you record this information in a log file as a record of the archiving procedure.
-
Enter a name for the log file in the Output file box.
Make sure that the path specified is a valid directory on the SQL server.
-
If you want to keep earlier information, select Append output to existing file.
If you do not select Append output to existing file, the log file will be replaced every time the archive procedure runs and you will lose earlier information unless you have taken other steps to retain it.
- Select the Include step output in history option.
- Click OK.
-
-
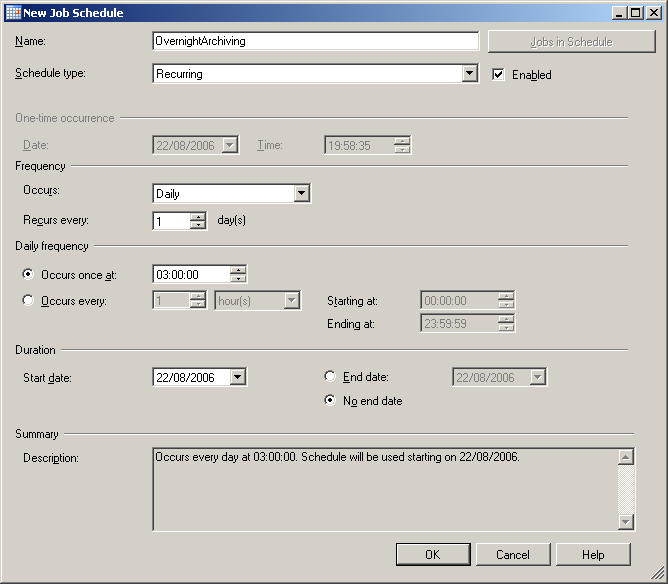
Create a schedule.
- Click Schedules.
-
Click New.
Although it is possible for users to access MyID while archiving is taking place, it is better to select an off-peak time (for example, overnight) so database performance is not affected.
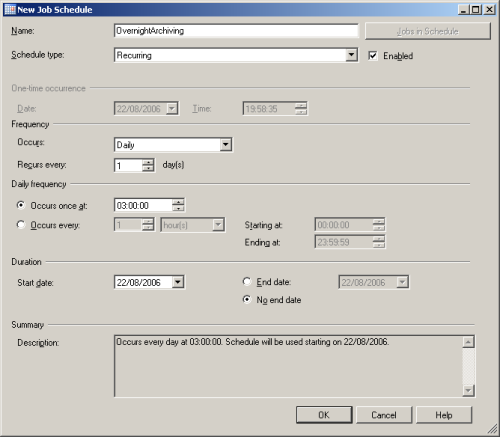
- Give the schedule an appropriate Name.
- Select Recurring in Schedule type.
- Make sure the Enabled box is selected.
- Set a schedule to meet your requirements. The example shows a daily schedule, at 3:00 a.m.
- Click OK on the New Job Schedule dialog box to accept the schedule.
- A summary of the schedule is displayed. Click OK.
-
Click Notifications.
-
Select Write to the Windows Application event log and When the job completes from the associated drop-down list.
You may optionally specify that operators be emailed or paged according to your own administrative policies. This would allow you to further track the status of the archiving.
- Click OK.
-


The timed archiving task is now configured. Check the logs to make sure that the audit archive procedure is running successfully.