2.2 Setting up email templates for FIDO registration
When a person requests a FIDO authenticator through the MyID Operator Client or the Self-Service Request Portal (assuming the credential profile is not set up for immediate registration), MyID sends two email messages; the first contains a link to the registration web page, and the second contains a single-use registration code.
You can edit the templates used for these messages; see section 2.2.2, Editing the notification templates.
For increased security, you can configure MyID to send the registration code by SMS instead of email; see section 2.2.3, Configuring the registration code to be sent by SMS.
2.2.1 Configuring your system for email notifications
You must configure your system with an SMTP server; see the Setting up email section in the Advanced Configuration Guide.
You must also ensure that everyone who is going to request a FIDO authenticator has an email address stored in their user account. You can use the Requisite User Data feature of the credential profile to prevent people who do not have email addresses from requesting FIDO authenticators; see section 2.5, Setting up credential profiles for FIDO authenticators.
2.2.2 Editing the notification templates
To edit the content of the FIDO registration messages:
-
Log on to MyID Desktop as an administrator.
-
From the Configuration category, select Email Templates.
-
Select one of the following templates, and click Modify:
-
Register FIDO Authenticator – this template contains the link to the MyID authentication web page.
You can provide the following information in this message:
-
%x – the URL of the MyID web server. This is taken from the URL Path configuration option; see section 2.1, Setting the configuration options.
-
%jobguid – the ID of the request for the FIDO authenticator.
Important: The registration URL you provide in the message must have the following format:
%x/web.oauth2/fido/register/begin?requestId=%jobguid
-
-
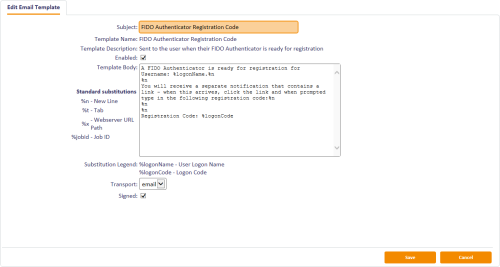
FIDO Authenticator Registration Code – this template contains the single-use registration code that the end user will enter to complete their registration.
You can provide the following information in this message:
-
%logonName – the person's logon name.
-
%logonCode – the FIDO registration code.
-
-
2.2.3 Configuring the registration code to be sent by SMS
To allow MyID to send SMS messages, set the SMS email notifications on the General tab of the Operation Settings workflow to Yes.
By default, SMS messages are sent to an Email to SMS gateway, in the format <cellnumber>@<gateway>, where:
- <cellnumber> – the cell phone number from the user's record.
- <gateway> – the URL from the SMS gateway URL for notifications option on the General tab of the Operation Settings workflow.
For example: [email protected]
If this is not suitable, you can customize the sp_CustomPrepareSMS stored procedure in the MyID database.
You must also edit the email template containing the registration code, and change it to use SMS instead of email for its transport:
-
Log on to MyID Desktop as an administrator.
-
From the Configuration category, select Email Templates.
-
Select the FIDO Authenticator Registration Code template, and click Modify.
The Edit Email Template screen appears.
-
From the Transport drop-down list, select sms.
-
Click Save.

Important: If you configure the registration codes to be sent by SMS, you must ensure that everyone who is going to request a FIDO authenticator has a mobile phone number stored in their user account. You can use the Requisite User Data feature of the credential profile to prevent people who do not have mobile phone numbers from requesting FIDO authenticators; see section 2.5, Setting up credential profiles for FIDO authenticators.