6.3 Running the installation program
If you are installing MyID on a system with multiple servers, see section 6.2, Split deployment for details of the order in which you must install each component.
You must install MyID with a user account that has sufficient permissions. See section 4.1.1, Installation account for details of the permissions required.
Note: The installation program requires that the installation user has Unrestricted execution policy for PowerShell scripts. You must make sure that the installation user has the correct permissions; for example, use the following PowerShell command:
Set-ExecutionPolicy -ExecutionPolicy Unrestricted -Scope CurrentUser
Once you have installed MyID, if required, you can remove this permission; for example:
Set-ExecutionPolicy -ExecutionPolicy Restricted -Scope CurrentUser
To determine what PowerShell permissions the current user has, you can use the following:
Get-ExecutionPolicy -List
To install MyID:
- Log on to the MyID server using the installation account.
-
Close all application windows.
Note: Once you have started the installation process, do not leave the installer program idle. Windows UAC may cancel the installation if you leave the program idle for too long, depending on your Windows environmental settings.
-
From the MyID installation folder, right-click the installation program – for example, MyIDServer-11.0.0.exe – then from the pop-up menu select Run as administrator.

-
Click Next.

-
Read the license agreement, accept the terms, and click Next.

By default, MyID installs to C:\Program Files (x86)\Intercede\MyID.
Click Browse to select a different installation folder.
-
Click Next.
-
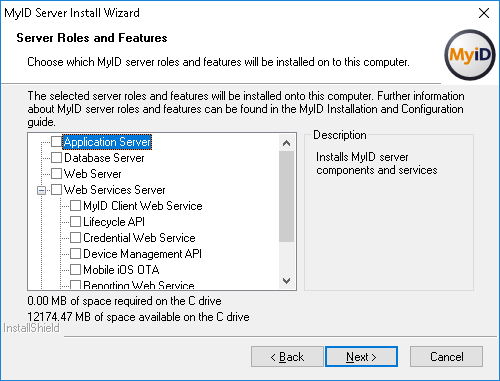
Select the roles and features you want to install:
- Application Server – contains the MyID application components.
- Database Server – contains the MyID database.
- Web Server – contains the MyID web server.
- Web Services Server – contains the MyID web services. You are recommended to install this on the same server as the Web Server; if you want to install the services on a different server, you must carry out additional configuration. See the Setting up the MyID web services on a standalone server section in the Web Service Architecture guide for details.
- MyID Client Web Service – required for MyID Desktop
- Lifecycle API –
- Credential Web Service –
- Device Management API –
- Mobile iOS OTA –
- Reporting Web Service –
- Derived Credentials Notifications Listener –
- SCEP API –
- Self-Service Request Portal –
- MyID Client Web Service – required for MyID Desktop
- Archive Database Server – contains a database that can contain an archive of some parts of the MyID database. Creating the database does not set up the archiving procedures; the Database configuration section in the Advanced Configuration Guide for details.
The roles and features you select determine which screens appear in the installation program. For example, the database screens appear only if you are installing the Database Server or Archive Database Server.
Click Next.

Note: You must have at least one web site configured in IIS.
-
Select the web site to use for the MyID virtual directory and web services, then click Next.

-
Type the URL of the MyID web server.
Specify the URL of the server, but not the full MyID Operator Client URL; that is, use an URL similar to:
https://myid.example.com
and not:
https://myid.example.com/MyID/OperatorClient/
Note: The web services used by the MyID Operator Client (rest.core and web.oath2) require SSL/TLS; if you do not connect through HTTPS, you cannot use the MyID Operator Client. See section 4.10, Setting up SSL/TLS for details.
If you experience any problems with this URL setting after installation, refer to the MyID Operator Client advanced configuration section in the MyID Operator Client guide for information on troubleshooting connection problems and manually configuring the URL.
Click Next.

-
Type the User Name and Password for the MyID COM+ user, then click Next.
See section 4.1.2, MyID COM+ account for details of the requirements of this user.

-
Type the User Name and Password for the MyID IIS user, then click Next.
See section 4.1.3, IIS user account for details of the requirements of this user.

-
Type the User Name and Password for the MyID Web Service user, then click Next.
See section 4.1.4, Web service user account for details of the requirements of this user.

-
Type the database server name.
If you are installing the database directly on the database server, you can select (local) from the drop-down list. Otherwise, you must type the name of the database server.
If your database server uses a named instance, type the name as server\instance – for example, MYSERVER\myinstance.
If your database server uses a port other than the default TCP 1433, type the name as server,port – for example, MYSERVER,1499.
-
Select the authentication type:
- Windows authentication – the user account being used to run the installation program is used to access the SQL Server database.
-
SQL Server authentication – you must specify the Login ID and Password for the user you want to use to authenticate to the SQL Server database.
Note: SQL Server authentication is supported only for Microsoft Azure databases. See the Microsoft Azure Integration Guide for details.
-
Type the Database Name for the MyID database you want to create on the database server.
The default is MyID.
Alternatively, you can click Browse to select an existing database.
Click Next.

-
Type the database server name.
If you are installing the database directly on the database server, you can select (local) from the drop-down list. Otherwise, you must type the name of the database server.
-
Select the authentication type.
The authentication options are the same as for the primary MyID database.
-
Type the Database Name for the MyID archive database you want to create on the database server.
The default is MyID_Archive.
Alternatively, you can click Browse to select an existing database.
Click Next.

-
If you are upgrading an existing installation, select the Upgrade the MyID databases selected on the previous stages option, then click Next.
Note: If you select this option, the installation program does not run the GenMaster program at the end of the installation – you do not need to run GenMaster if you are upgrading a system.

-
Review the options you have select, then click Install to start the installation process,
Note: If an error appears that says that a service has failed to start, you may not have configured one or more of your service accounts to have Log on as a service. See section 4.1, Setting up user accounts for details.
The GenMaster application starts. GenMaster allows you to secure your MyID installation with a master key, and to set up a startup user that you can use to access the system for the first time.
See section 6.5, Using GenMaster for details.
Once you have completed the GenMaster setup, close the Card Manager Startup dialog:

-
Finally, click Finish.

Important: If you want to be able to uninstall the changes made by the update, or if you want to upgrade your system, you must not remove or move the server configuration update scripts after you have run them; the install location is registered and contains information required to uninstall the changes that have been made. The upgrade process uninstalls these changes before applying the new version.


6.3.1 Updates
Intercede may have provided you with an update to your system that you must install after running the main MyID installation program. See section 7, Updating MyID for details.
6.3.2 Windows Event Viewer messages
You may notice event log messages after the installation. For example:
During installation of this component into a COM+ application a registry value was changed from its original value. If you are experiencing activation problems with this component then please check the registry values.
This can happen for the edeficeBOL_PKI.dll.
You may also see an error in the event log relating to MsiExec.exe, which is related to a message in the MSI installer log with a corresponding timestamp and the following text:
EEUI - Install failure: Calling shutdown on EEUI DLL
These messages are expected and do not affect the installation.